Where does the time go and why am I so far behind?
I have made a conscientious effort to stop using Facebook so much. For me it has become such a time user.
I am going to concentrate on things I want to get done and use it as a reward.
Wish me luck!!
Friday, June 15, 2012
Monday, November 21, 2011
Easy Cathedral Window quilt
Cute idea for a baby quilt or even a larger quilt is you are so inclined. To see instructions for this quilt, visit the Moda Bake Shop...made by Amy of Stitcher Dickery Dock!

If you're like me, you're probably always on the lookout for cute, memorable baby shower gift ideas (I feel like I get an invite to one every time I check the mail!). Perhaps you'd like to gift something a little more "wow" than the usual onesies and burp cloths? Look no further! This darling cathedral window baby playmat is like no other. It is constructed using a unique method that requires no basting, no traditional quilting, and no binding. Plus, it's nice and thick- super cooshie for that sweet little tooshie!

-1 Layer Cake (40 10" squares to be exact- you'll have 2 leftover to use for something else)
-Crib Size Batting (at least 40" X 50")
-Cardboard backing from your layer cake package (or a cereal box) for templates

Rotary Circle Cutter- this affordable little tool is worth it's weight in gold! Pick one up here, or you can just use an 18 or 28mm traditional rotary cutter to get the job done instead (the smaller, the better).

1. Fold your layer cake square in fourths, and press the folded corner.


1 dreamy Cathedral Window Baby Playmat- 24" X 29"


Cathedral Window Baby Playmat

Hi! I'm Amy Gibson of Stitchery Dickory Dock and I'm so excited to share a recipe with you today!
-1 Layer Cake (40 10" squares to be exact- you'll have 2 leftover to use for something else)
-Crib Size Batting (at least 40" X 50")
-Cardboard backing from your layer cake package (or a cereal box) for templates
Rotary Circle Cutter- this affordable little tool is worth it's weight in gold! Pick one up here, or you can just use an 18 or 28mm traditional rotary cutter to get the job done instead (the smaller, the better).
1. Fold your layer cake square in fourths, and press the folded corner.

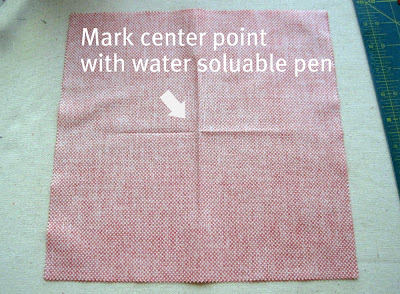
2. Open it up and mark the center point with a water-soluble fabric pen.

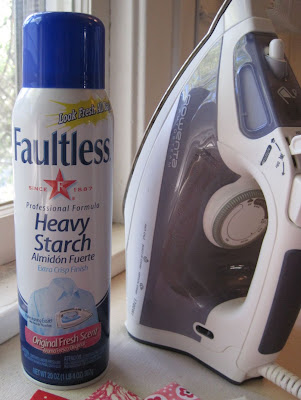
3. To prepare the fabric for easier circle-cutting, give your square a healthy shot of Faultless Heavy Starch and press. I find that the stiffer the fabric is, the less it wants to wrinkle up and get funky when you cut. Now mark and press all 40 of your squares.

4. Time to cut! If you have an Olfa circle cutter, you know why I'm sounding a bit excited right now. This little baby is a wonder- sliced my cutting time in half and gave me near perfect accuracy. Shockingly, they are priced the same or cheaper than a standard rotary cutter. I think it is worth every penny. BUT, if you can't get one, your smaller blade standard rotary cutter will work too!

Circle Cutters- position the sharp point on the center mark of your square, and loosen the screw to adjust the distance of the blade- aim for close to 1/4" from the edge if possible, but it honestly doesn't matter what your exact diameter is- as long as you maintain the exact same distance for all of your cutting.
**Note: these circle cutters are fantastic, but if you haven't used one before, I suggest practicing on some scrap fabric to give you a feel for it before you start cutting your Layer Cake. I found that quick, overlapping back and forth motions, rather than a single fluid pass, resulted in less fabric movement.
Standard Rotary Cutters: you will need to create a circle template. Find a bowl that's the right size (about 9.5" in diameter), trace around it on the cardboard from the back of your Layer Cake, and cut it out with scissors.


5. Batting! Cut 20 circles the exact same way you did with your fabric.

6. Sort your fabric into 20 contrasting pairs (ie- dark with a light, large print with a small print, etc).
Now layout your pairs and decide on 1 circle per pair that will be on top (ie- in the center of your cathedral windows)- mark an X on the wrong of that circle with a water-soluble marker.
7. Layer a pair of fabric circles, right sides together, on top of a batting circle. Make sure that the circle with the marked X is on top.

8. Pin around the edge.

9. Using your walking foot, stitch 1/4" seam around the entire edge, being sure to back-tack at the end of the seam.

10. Now set down your stitched circle, X marked side facing up, and mark a 2" line, centered, 1" in from your seam.

11. Pick up your circle and carefully pull the 2 layers of fabric apart, pinching the line you just drew in half between your fingers. Double check to make certain you are only pinching 1 layer of fabric. Cut along the line.

12. Using the small hold you just cut, turn circles right side out. (This step goes much faster if you can coerce your husband into doing it while he's watching football!)
13. Press, poking the edges out as necessary to give a nice smooth curve.

13. Now, take your cardboard (if you used it to make the circle template, you can either cut into it again, or get another piece), then mark and cut a square that just barely touches the edges of the circle at the corners. Mine was 5.5", but I advise you to wait to cut until you measure, as your circle size could vary slightly from mine. Again, this is ok- what's most important is that they are all the same, and your square template fits your circles perfectly.

14. Go ahead and layout your circles in 5 rows of 4, to get an idea of which prints you want on top. Be sure to peak under the edges to make sure you like the layout of the underside colors as well. Also, make sure that all of the little slits you cut are facing up, and are positioned outside of this square (not on the corner). This way they'll be totally hidden when you stitch the flaps down!
15. With your water-soluble fabric pen, mark around the square on the top side of all 20 circles.

16. To begin piecing the first row, take 2 circles, right (or "top") sides out, match up 2 corners of the marked squares, pin, and stitch along the line, back-taking at the beginning and end of the seam. Hopefully a child doesn't tug on your leg just as you're finishing, so you're able to keep it reasonably on the line (unlike me!).

17. Open and behold the wonder! Things are starting to take shape! Continue pinning and stitching these seams, until you have all 5 rows of 4 constructed.

18. Now take 2 rows, right sides out, match up the seams and pin, just as you have been doing, only this time you'll sew one continuous seam along the entire row.

19. Stitch along the line, taking care that the flaps on top and beneath are open and flat. Move continuously from one circle to the next, back-tacking only at the beginning and end of the row.

**Take care not to sew over the folded flaps, but just below them. This is crucial, even if you have to stray from your marked line a tad to stay below the folds, as it could hinder your mat from lying flat.

20. Once you've finished sewing all of the rows together, press all of the flaps down. It's ok if you have a bit of extra fabric in the middle of the circles (wrinkles)- you can easily tuck it beneath the petals when you stitch them down.

21. Now, with your walking foot still on, stitch the petals down an 1/8" from the edge. The quickest way to do this is to stitch them by rows, staying on the same side of the petals all the way down the row, then turning and coming back the other way on the opposite side of the petals (rather than sewing around each petal individually).
Finish it off by top stitching am 1/8" seam around the entire outside edge of the mat.


And there you have it! Your mat is good to go- no additional quilting or binding needed! Now run it through the wash and give it one last steamy press, before gifting it a lucky mom-to-be and wowing everyone at the shower with your mad skills!!!
1 dreamy Cathedral Window Baby Playmat- 24" X 29"


Sunday, August 7, 2011
Getting serious
Way too much time has gone by since my last post! I have decided it is time to get serious about this 'business' even if life does get in the way! I hope to retire from education in 2 years and I know with the economy the way it is, I will have to supplement my income. I will also need something to keep me from getting bored!
I have purchased a Sweet Sixteen HandiQuilter machine and have been spending lots of time practicing! I love sitting down and quilting and moving the fabric. I can do lots more detail quilting than I have been able to do in the past!
Now on to finishing all my quilt tops so that I can perfect my quilting technique and perhaps quilt for others!


Saturday, October 9, 2010
Life has gotten in the way
It has been awhile since I last posted to my blog. Life has a way of doing that. My husband's health has really deteriorated so I have been spending lots of time with doctor visits and trying to balance work and playing with my grandchildren.
I have been fortunate at work and have been given the chance for some fabulous training through Apple Computers. I attended an Apple Academy in Cupertino, CA this summer that was simply outstanding! Now I am facilitating training for our students and our teachers in our school district on the use of MacBooks. All students in grades 8 through 12 have been given their own laptop along with all of the teachers in our district.
My business has temporarily been put on hold while I explore this new adventure that life has given to me! I still enjoy sewing, quilting and crafting and will work on my fun projects as time permits. Retirement is not that far away so I hope to work towards retirement and building up this side business before too long!
I have promised another crib set to my daughter-in-law's sister, so as soon as she knows what color she would like her set in, I will be working on that and posting pictures!
Saturday, April 10, 2010
Custom Crib Layout


Pictures of my first custom crib layout. I loved making the Minkee sheet. It is soooo soft! The only hold up was the embroidery (the Large M). My machine doesn't do anything that large and I had to ask my sister to help. She had just purchased her new commercial embroidery machine (less than a week) and it was definitely a learning experience!
This one was fun and easy because I made it for my new grandson!
Friday, March 19, 2010
One Step Closer
I am one step closer to getting things ready to go. I have applied for and received a tax number. Now I am just waiting for my resale certificate to come in the mail.
It's a little scary, but I am also excited. I have set the date to officially start my business on May 1, 2010.
I am going to spend the next 6 weeks organizing and making samples of my items that I want to sell.
Check back soon! Hopefully things will go well and I will be ready to go on that date!
Until then, visit my sewing blog at Fairy Dust Musings...because it's going to take a little fairy dust and a lot of magic to help me get some projects done.
Thursday, March 11, 2010
Soon Open for Business
Hi! Thanks for checking out my blog!
Lightening Bug Designs is a new sewing and crafting business. I am in the planning and setting up process, so please check back in about a month (or sew) to see what I have coming up.
I will feature homemade items such as custom baby bedding, children's clothing, quilting and other crafting and sewing ideas!
I love following other blogs. There are so many creative people out in the world wide web! You inspire me!
Until I am up and running at this location, visit me at Fairy Dust Musings...where magic happens!
Subscribe to:
Posts (Atom)
